Contents
What is STK500?
The STK500 is a starter kit developed by Atmel for their AVR microcontrollers. Additionally, the STK500 is capable of designing and programming codes for these AVR microcontrollers and other prototypes.
It also helps designers try out new things and create unique designs. Furthermore, designers can use Atmel’s IDE to debug and write codes with the STK500.
With STK500, you can also program Arduino boards easily. How? It eliminates the need to use Arduino IDE. For this reason, Arduino fans can program nodes directly or via internet browsers.
However, they’ll still need a javascript-enabled STK500v1 programmer for this task.
Features
The STK500 comes packed with many features that make programming fun and easy. These features include:
- Serial in-system programming.
- The STK500 kit comes with LEDs and push buttons for experimentation.
- It also has sockets for four types of AVR devices, including 8-,20-,28-, and 40-pin devices.
- You can easily upgrade from the AVR studio.
- The STK500 also features in-system programming for external target systems.
- You can get access to a flexible clocking, reset, and voltage system.
- The R2-232 on the STK500 allows interfacing with computers.
- The STK500 kit also offers an extra RS-232 driver and connector.
- You can use the STK500 for serial, high-voltage, and parallel programming.
- Also, you can use pin header connectors to access all AVR I/O ports easily.
- The STK500 works with a supply voltage of 9-12v.
- It also works with a 1.8-6.0v target voltage.
How to Program on an STK500?
Before we get into programming with an STK500, there are vital prerequisites. They involve setting up your hardware and connecting everything properly before using your STK500.
Hardware Setup
Here are six hardware setup requirements you need to meet before powering up your STK500:
- Connect the power supply to the power connector, and make sure you connect the supply to the mains voltage.
- Afterward, join the 10-pin ribbon cable between the PORTD and SWITCHES connectors.
- Next, combine a second 10-pin ribbon cable between the PORTD and LEDS connectors.
- Link the serial programming cable to your computer’s serial port and the RS232 CTRL connector.
- Connect the computer’s bon cable between the SPROG3 and ISP6PIN connectors.
- Mount the Atmega32 chip in the SCKT3100A3 socket. Ensure the chip’s marker points towards SWITCHES.
After fulfilling these chips, power up your STK500; the LED will glow red, then green once the booting process is over. At this point, the STK500 is ready to go.
Programming on an STK500
First, check if your STK500’s programming function is working correctly. You can use this command functioSTK500’sd out.
For Avrdude, use the following command:
If it works, you’ll see a report indicating your target device is present.
How to Upload a Code
You’ll easily upload a code to your STK500 using Avrdude. For example, if that’s a hex-code file, use to following commands to upload it:
When the code gets uploaded, the STK’s LEDs will display a yellow light. When the upload is complete, you’ll see a suSTK report.
Note: Change ‘test. room to the name of your file
Settiyou’ll Clock Source
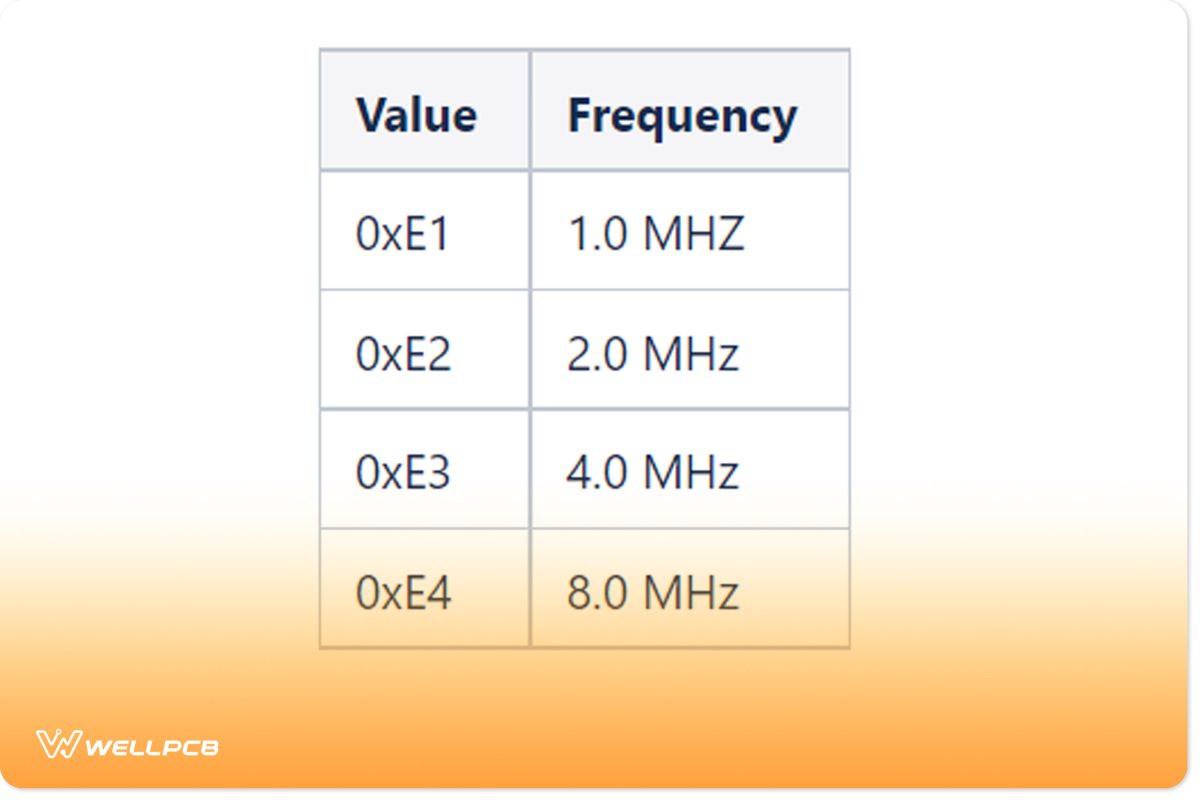
The STK500 uses changes’ renal RC-oscillator as its system clock source. It also utilizes fuse bits (specifically the lower fuse byte) to select its clock source. You can use the following command to read fuses:
Check the AVR database for more details.
Note: the clock source stays on 1.0 MHZ for all pre-project activities.

Fuse Byte Table
Note: the clock source stays on 1.0 MHZ for all pre-project activities
Common Mistakes Made when Programming on the STK 500
Here are some common mistakes to avoid when using the STK 500:
Errors with the Ports and Pins
Remember to permanently connect the other terminals of the STK500’s LEDs to a voltage source. Also, the LEDs glow when the ATMEGA32’s PORT pin is on ground level (zero).
However, if STK500’st sets the LED port as output, your LEDs will only have aATMEGA32’sthat’s almost invisible. Therefore, you should also not use the button port as input and the pull-up resistors as ON.
You can use that datasheet to ensure you have connected the correct ports and pins.
Errors with Timing
If your project involves accurate timing, you’ll need hardware PWM or interrupt features. So, avoid using delay_us and delay_ms functions because they’re not, so you’ll
These functions are more similar to an empty loop. They won’t work correctly without the code they’re flagging and the compiler optimization level. You’ll get low or high-time delays and won’t use these functions without code’s ization.
Coding on your STK500
You’ll need the AYou’llc library for coding on your STK 500. But what is an AVR-libc? It’s a library for working AVRs.
AddYou’lllly, various programs can help you test your development tools and coding. You cIt’s here to find these programs.
What is the STK600?
The STK600 is simply an updated variant of the STK 500 with even more features for programming AVR microcontrollers. It also has USB ports, and its development kit comes with a USB cable.
Final Words
The STK 500 is excellent for programming in a safe environment and getting a fresh taste of a different development board. It also has excellent support for AVR devices and even Arduino (with an STK 500 programmer.)
Interestingly, the STK 500 programmer uses JavaScript to enable direct coding on Arduino boards. It also works with an STK500v2 browser implementation to allow programming Arduinos through browsers.
What are your thoughts on the STK 500? Let us know if you have any questions.


