
Contents
What is an MPU 9250 Arduino?

Fig 1: A Motion Sensor
It is a Micro-Electro-Mechanical System (MEMs) Sensor that is also Arduino compatible. Thus, it is an effective tool in motion-tracking measurements and applications.
In addition to compatibility with Arduino Uno, it is a high-performing component with relatively low power consumption.
Moreover, unlike the former MPU-9150 sensor and other wearable sensors, the MPU-9250 sensor features a relatively small form factor.
Lastly, it combines the features of the Accelerometer, Gyroscope, and magnetometer outputs. Again, it condenses two dies to form a single QFN package. One die has an AK8963 3-axis magnetometer, while the other features an accelerometer and a 3-axis Gyroscope.
Pin Configuration for MPU 9250 Sensor Module

Fig 2: An Expert Fixing a Motion Sensor
The table below gives the pin configuration of the MPU-9250 9 Axis Sensor.

MPU 9250 Features
Fig 3: A White Motion Sensor
| Gyroscope Properties | Accelerometer Properties | Magnetometer Pro |
| It has X, Y, and Z Digital-output angular rate sensors with a full-scale range of between ±250, ±500, ±1000, and ±2000 degrees per sec. Also, it features a 16-bit integrated ADC. | Also, a triple output accelerometer (3-axis accelerometer) with integrated 16-bit ADCs of ±2g, ±4g, ±8g &±16g | It’s a monolithic hall effect magnetic sensor. Again, the magnetometer axes are three, and it additionally features a magnetic concentrator. |
| Besides, it has a low-pass filter that is digitally programmable. | Secondly, the accelerometer has an operating current of 450µA | Also, it features a relatively wide range of measurements and high resolution and consumes low current. |
| Thirdly, it features an operating current of 3.2mA. | You can also set the accelerometer to a low power mode of 8.4µA while at 0.98Hz and 19.8µA while at 31.25Hz | Moreover, its operating current is 280µA when set at a repetition rate of 8Hz. |
| Its sleep mode current is 8µA. | Also, like the gyroscope, it has a sleep mode current of 8µA. | Furthermore, the 14-bit Output data resolution is at 0.6µT/LSB |
| Further, the module comes with an already calibrated sensitivity scale factor from the manufacturer | Besides, it features User-programmable interrupts together with a Wake-on-motion interrupt. The latter is essential in the application processor’s low-power operations. | Additionally, it has an extensive measurement range of ±4800µT. |
| Lastly, it features a self-test function. | Finally, it’s also a self-test device. | It is also a self-test device featuring an internal magnetic source. |
MPU 9250 vs. MPU 9150: The Improvements

Fig 4: Fixing a Motion Sensor
Here are some of the features in hardware connection and function where the MPU 9250 beats the former MPU 9150:
- First, the MPU 9250 is relatively smaller and consumes less power than the MPU 9150.
- Also, the Gyro and Compass performances of the MPU-9250 are relatively better than those of the MPU 9150.
- Thirdly, the MPU-9250 sports an AK8963 magnetometer and MPU-6500, while the other has an AK8975 magnetometer and an MPU-6050.
- Moreover, the MPU 9250 has relatively higher power and lesser noise than the MPU 9150 due to the MPU-6500 feature.
- Finally, the MPU 9250 has an improved full-scale range over the MPU 9150, thanks to the AK8963 magnetometer.

MPU 9250 Arduino Guide
First, make connections, as illustrated in the diagram below.
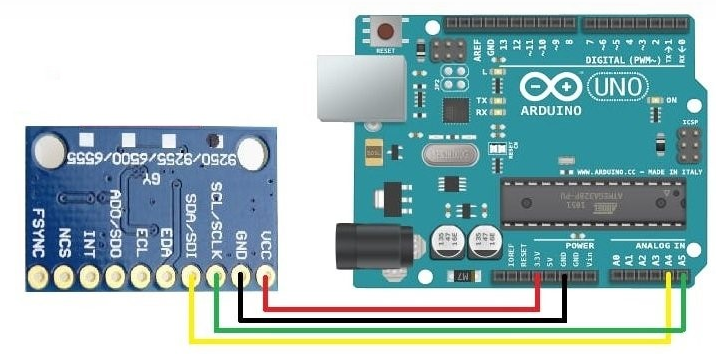
Also, the table below is handy in showing where to connect the multi-chip module to the Arduino.

Further Steps
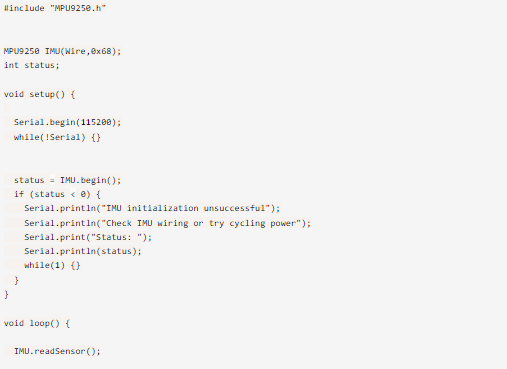
After making the above connections, download and install the MPU-9250 library in the Arduino IDE.
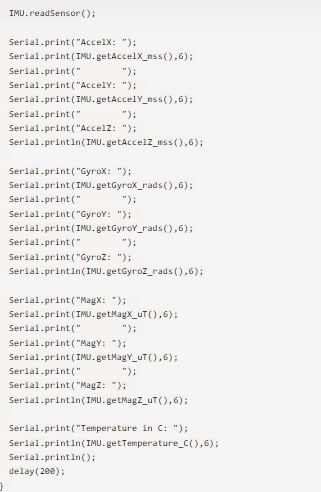
Next, restart the Arduino IDE and then upload the code below. It should give 3 accelerometer values, 3 gyro values, and 3 magnetic field values.
MPU 9250 Applications

Fig 5: Controlling a TV with remote control.
- It is useful in 3 dimension remote controls, especially in Internet-connected TVs.
- Secondly, it’s handy in wearable sensor manufacturing, tablets, and smartphones.
- Also, it is essential in Motion-based gaming applications.
Conclusion
From our guide, you’re now conversant with the workings of the MPU 9250 MEMS MotionTracking™ sensor. In the future, don’t hesitate to talk to us in case you have any queries about the component.


