Contents
What is the STM32 Nucleo Board?
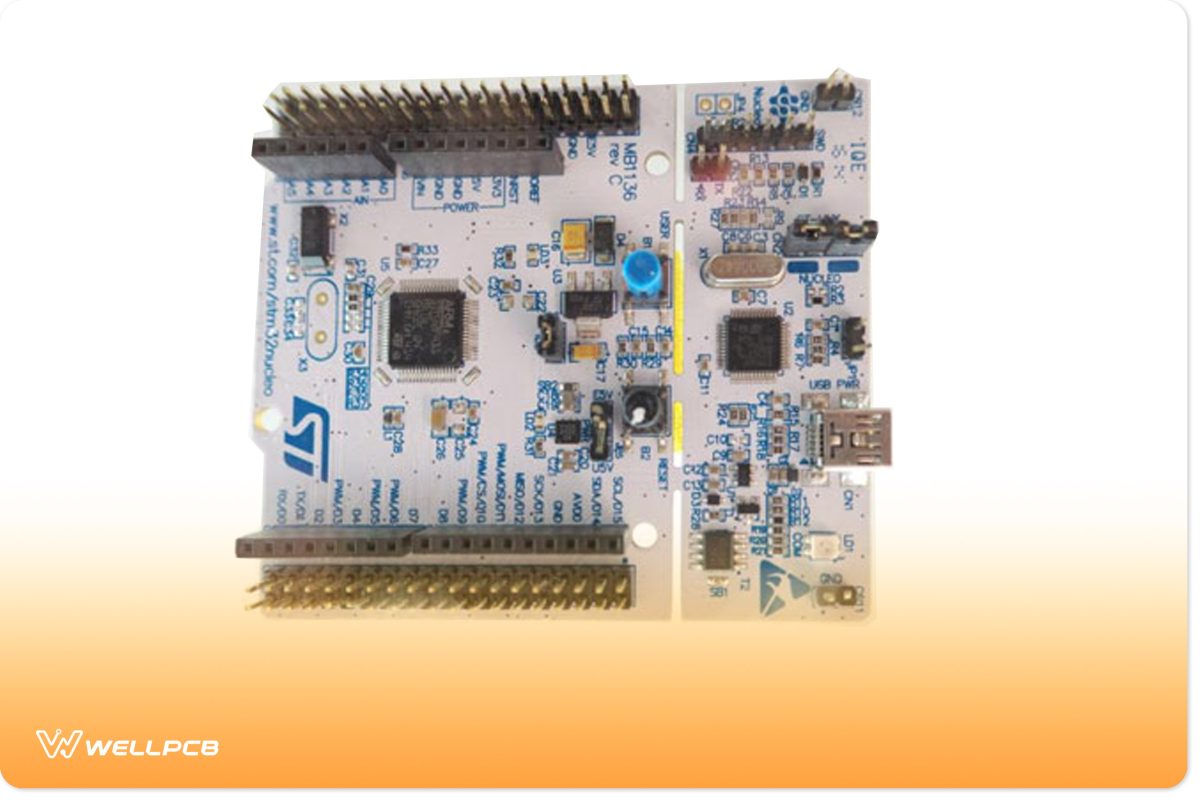
The STM32 Nucleo development board offers developers various possibilities to create prototypes. Also, the board is a versatile and affordable option for designers to try new ideas with the STM32 MCU family.
Interestingly, these boards feature connectors that allow them to add extensions. Further, the STM32 extends its functionalities using various hardware add-ons (application-related). So, these connectors can work with Arduino and enable designers to access all the MCU’s available real-time operating systems.
Additionally, these boards don’t need any separate probes. And it’s because STM32 Nucleo boards come with an ST-LINK programmer/board debugger. Also, STM32 Nucleo boards have pre-installed the HAL software library and various software examples.
Moreover, these boards are compatible with Keli MDK-ARM, IAR EWARM, and LLVM/GCC-based IDEs (integrated development environments).

Features
The STM32 Nucleus offers developers several valuable features, including:
- The board has two extensions: an Arduino-compatible connector and an STMicroelectronics Morpho extension connector.
- Lack of a rigid power supply. Hence, you can power the STM32 Nucleos with a USB VBUS, an external source, or through the power management access point.
- It comes equipped with three LEDs for different purposes. LED 1 is for USB communication, LED 2 is the user LED, and LED 3 is the power indicator.
- The board supports three USB interfaces: mass storage, debug, and virtual com port.
- The board’s ST-LINK/V2-1 debugger/programmer is accessible. So, you can even use selection mode for the ST-LINK/V2-1 as a standalone kit.
- STM32 Nucleo is a mbed-enabled board.
- The board features two push buttons: one user and one reset.
How do I Connect my STM32 Nucleo to My PC?
It’s pretty easy to connect your STM32 Nucleo to a PC. So, you only need a USB cable and some software tool installation.
However, installing the required software can be tricky. Follow the procedure below to make things less complicated:
- First, open your web browser and visit the Nucleo firmware page. But if you have not installed the ST-link driver, you can do that here.
- After installing your driver, do the firmware update. Start by downloading the latest ST-LINK/V2-1 firmware from the Nucleo page.
- Then, extract the update and open the STLinkUpgrade.exe.
- Next, plug your Nucleo board into your PC with a USB cable and wait for the USB enumeration process.
- Afterward, click “Connect.” If you installed the driver correctly, it will connect, and you’ll see the driver’s current version.
- Then, start the upgrade process. Once the upgrade is over, your STM Nucleo should appear as a USB storage device.
How do You use an Arduino IDE with STM32 Nucleo?
The STM Nucleo is a more affordable and flexible development platform when compared to Arduino and even offers better stats.
But if you’re a fan of Arduino, you can use most STM32 Nucleo boards on Arduino IDE.
Follow the steps below to use Arduino IDE with the STM32 Nucleo.
Step 1: Open Your Arduino IDE
First, go to your Arduino IDE and navigate to files. Then, select preference and input the link in “Additional Board Manager URL.”
Then, close the preference tab.
Step 2: Package Installation
Next, we need to install the SMT32 Core package. What you need to do here is navigate to “Tools” and then “Board.” A drop-down menu should open. Then, you can select “Boards manager.”
When the Board device manager is open, find the “SMT32 Core” package and click Install.
Step 3: Map Your Pins
You need to remap the Nucleo pins to fit the Arduino IDE. Also, remapping makes it easier to remember some pin notations.
You can download the Header file here and copy it to Arduino’s library directory.
The default directory should be C:Program Files (x86)Arduinolibraries.
Step 4: Code with a Basic Example
First, you must select the board and serial port connected to your pc. You can do this by navigating to “Tools,” clicking on “Board,” and waiting for the drop-down menu.
Then, navigate to Nucleo and select the relevant one. After, select ‘Tools” again and choose the board’s number part. Then, select your board’s number.
Once again, select “Tools” and “Port.” Further, select the port you used to connect your Nucleo board.
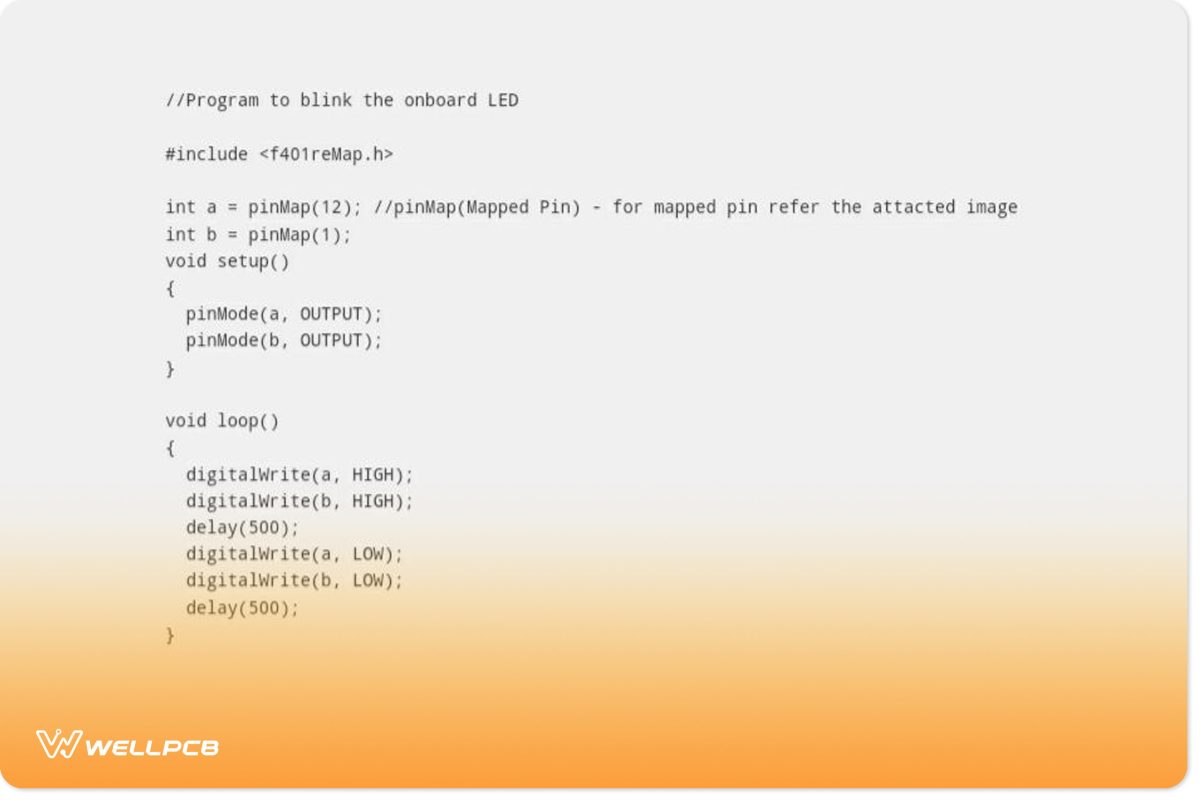
Now, we can test coding with a basic example: the blink program. Here’s the code you need to try this program:

SMT32 vs. ARDUINO
The SMT32 and Arduino offer exciting features that make them one of the best microcontrollers on the market. No doubt, you can use the SMT32 on Arduino IDE. But it’s not the same as using a regular Arduino board.
Now, let’s look at the differences between these development boards.
Similarities
SMT32 and Arduino are development boards that are easy to use compared to other counterparts.
Differences
Arduino
Arduino is very easy to use. Its central control comes from the AVR microcontroller.
Also, the board has high code bundling, making it easier to develop any software tool. In addition, Arduino is easy to use, with a bit of knowledge of C++ and hardware.
SMT32
On the other hand, the SMT32 board is more tuned to engineering practice. So, based on the development tools, SMT32 can go from easy to very complicated.
SMT32 is not beginner-friendly, and it’s more popular among professional developers. However, it’s still an easy and flexible way to develop prototypes for products.
SMT32 vs. Arduino: Final Verdict
In truth, both boards have their strengths. Arduino works better for DIY enthusiasts and hobbyists who want to do general electronics. And the SMT32 is a more solid option for manufacturing, developing prototypes, and actual products.
Rounding Up
The SMT32 Nucleo is great for prototyping and exploring the SMT32 MCU family. However, it gets complex when you go in without professionalism.
But, once you get the hang of it, the SMT32 is one of the easiest and most flexible ways to develop natural products.
Do you have more questions about the SMT32 Nucleo? Don’t hesitate to contact us.


